
Raspberry Pi 4 starter kit 8GB radikad, vent, korpus, juhtm
- Eseme ID: 243395896
- Jaga


Raspberry Pi 4 starter kit 8GB radikad, vent, korpus, juhtm
| Lõpphind: | 69.90 EUR |
|---|---|
| Pikenev lõpp: | 10 minutit |
| Algusaeg: | T 02.12.2025 21:05:25 |
| Lõpuaeg: | N 04.12.2025 18:01:47 |
| Vaadatud: | 27 |
| Viimati pakkus: | Golde |
- Turvatud maksed
- Autenditud müüjad
- Kiire klienditugi
- Soodne transport
| Seisukord: | Kasutatud |
|---|---|
| Asukoht: | Tartu, Tartumaa, Eesti |
| Kogus: | 1 |
| Transport: |
Omniva (S)
DPD pakiautomaat (M)
Unisend (M) |
| Maksmine: | sularahas, deposiidikandega, Osta.ee e-konto ülekandega |
| Müüja: | dablju100%positiivset tagasisidet Vaata müüja teisi esemeid |
Kasutamata komplekt.
Karp räsitud.
Info lingil https://www.rs-online.com/designspark/getting-started-with-okdo-raspberry-pi-4-b-starter-kit,
https://www.oomipood.ee/en/product/rpi_starter_8gb_okdo_okdo_raspberry_pi_4_starter_kit_8gb
This exclusive 8-piece Raspberry Pi 4 starter kit from OKdo includes everything you need to get going in the world of Raspberry Pi – from all the hardware in a single box, to access to an online step-by-step guide as well as projects to get up and running faster than ever, effortlessly. Simply plug into a monitor, keyboard, mouse and power supply and you’re ready to go.
What’s in the OKdo Raspberry Pi 8GB starter kit?
- Raspberry Pi 4 Model B 8GB board.
- 5.1v Power supply with 4 x interchangeable mains adaptors.
- USB to USB-C cable with in-line switch.
- 2 x Micro HDMI to HDMI cables.
- SanDisk 3D Gen3 X3 256Gb 2-Plane NAND Flash Die for 32GB MicroSD Card. (with NOOBS 3.1.1 preloaded)
- SD card reader.
- 3 x Heat sinks.
- Aluminium Raspberry Pi case with an integrated fan.
Step 1: Mount heatsinks
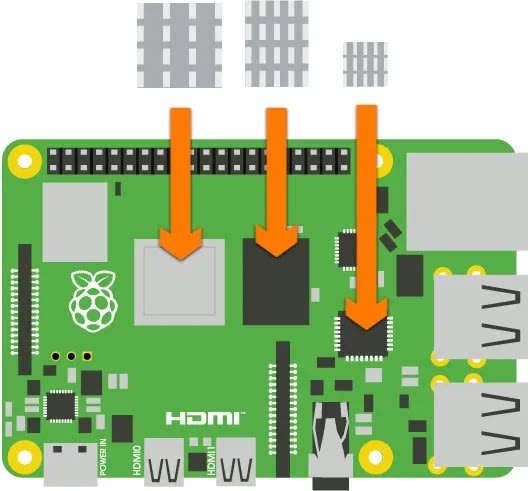
- Peel the protective backing from the heatsinks and stick them to the components shown in the diagram above
Step 2: Insert Raspberry Pi into case
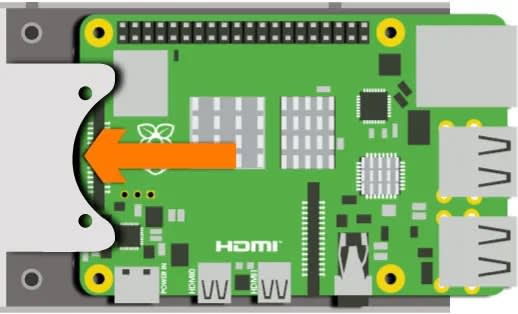
- Insert Raspberry Pi into the case
Step 3: Secure screws
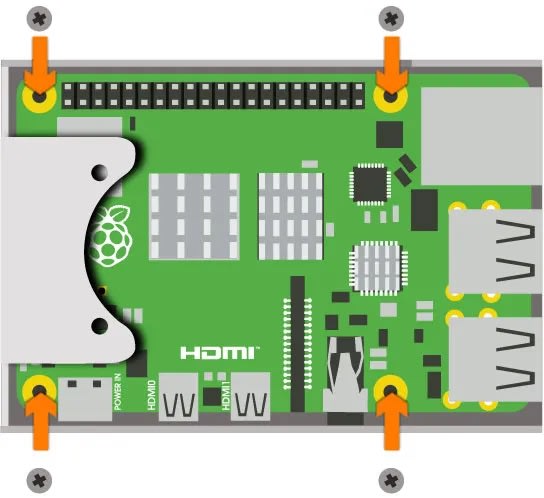
- Secure the 4 screws that hold the Raspberry Pi to the case
Step 4: Position fan
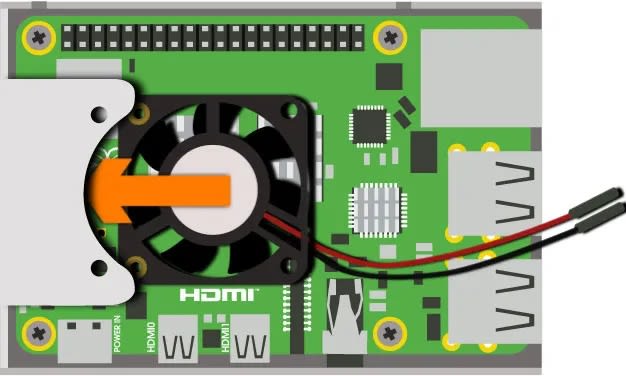
- Slide the fan into position
Step 5: Secure fan screws

- Secure the 2 screws that hold the fan in place
Step 6: Connect fan
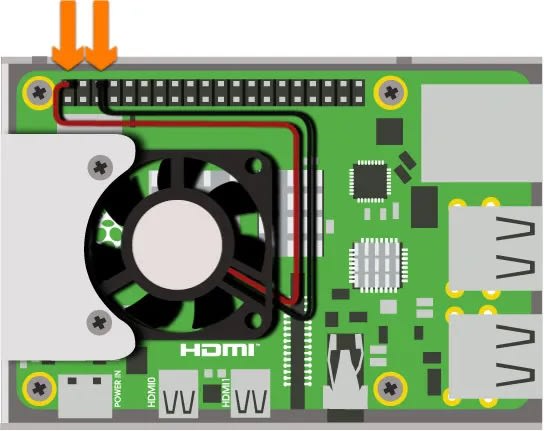
- Connect the positive (red) cable of the fan to the pin shown above
- Connect the negative (black) cable of the fan to the pin shown above
Step 7: Stick on feet
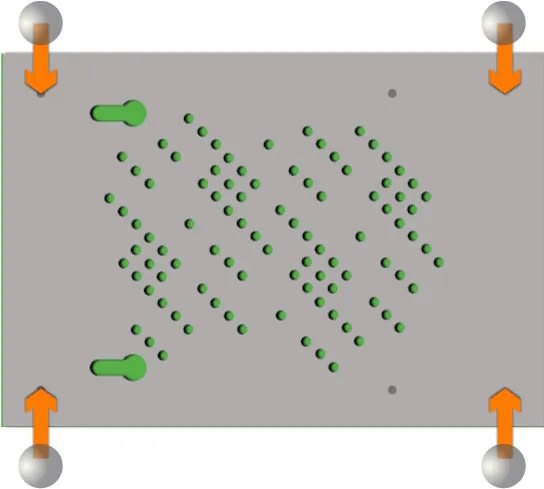
- Turn the Raspberry Pi and case around and stick the self-adhesive feet to the case
Step 8: Insert micro SD card

- Insert the micro SD card into the slot of the Raspberry Pi
Step 9: Connect mouse & keyboard
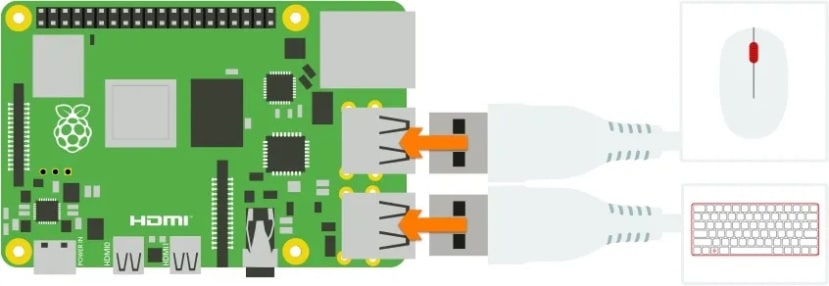
- Connect the mouse and keyboard to any 2 of the USB ports
Step 10: Connect screen

- Connect the screen to the HDMI port labelled “HDMI0”
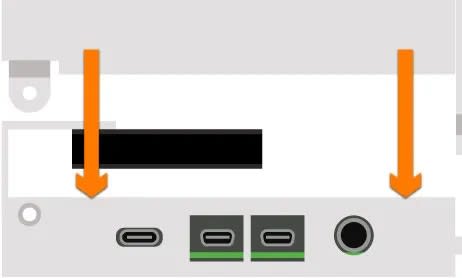
Step 11: Connect power

- Connect the power cable to the port labelled “POWER”
- Ensure that the switch on the power cable is turned on
Step 12: Follow on-screen instructions

- Your Raspberry Pi will boot and display the desktop
- The first time you start up your Raspberry Pi, the Welcome to Raspberry Pi application will pop-up, guiding you through the initial setup
Step 13: Close case
The following steps are optional and not needed if you plan to use the GPIO pins in your projects.
- Carefully slide the top of the case into position ensuring that all the small tabs snap into place and the screw holes are aligned
Step 14: Secure case screw

- Use the remaining screw to secure the lid to the base of the case
Oksjoni eest tasuda 7 päeva jooksul e-kontole või deposiidiga ning kinnitada pakiautomaat.
Küsimused müüjale
Ainult vastatud küsimused on kõigile nähtavad. NB! Oma kontaktandmete jagamise korral ei saa Osta.ee teid petturite eest kaitsta.